
Improving the inspector in Unity can have significant benefits for game development efficiency and workflow.
An organized and easy-to-read inspector layout can provide quick access to game objects, components, and properties, making it simpler to identify and modify different elements of the game without having to navigate a cluttered and confusing interface.
In addition, input validation in the inspector can reduce the likelihood of errors and mistakes by preventing developers from accidentally entering invalid or out-of-range values.
While custom inspectors and editors can be used for this purpose, even simple improvements such as good naming and attributes can make a big difference in enhancing the inspector experience.
Example
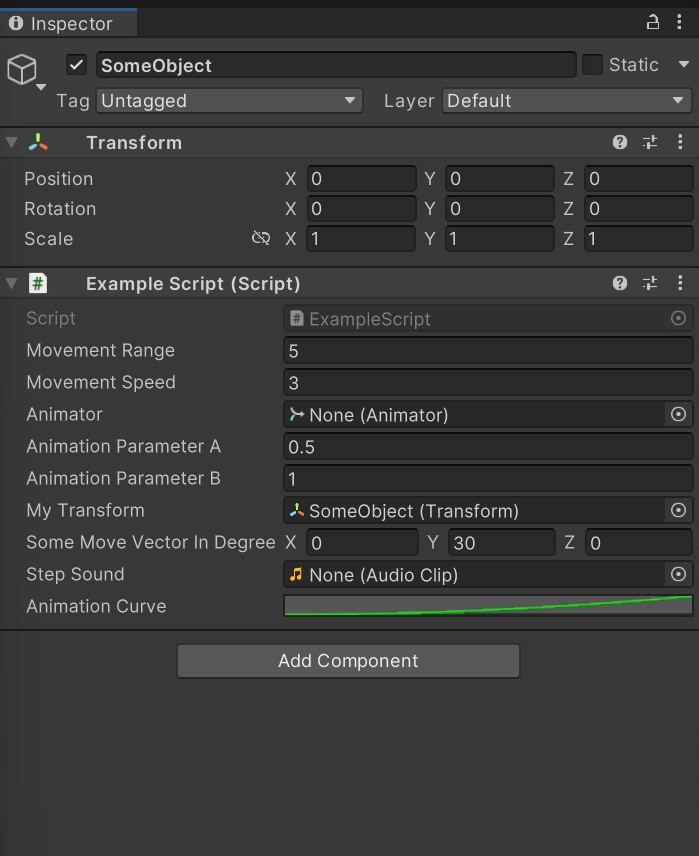
To illustrate the concept, I will use the following example script to show how to enhance the inspector gradually.
using UnityEngine;

public class ExampleScript : MonoBehaviour
{
  /// <summary>
  /// Must be in the Range 1 - 10
  /// </summary>
  [SerializeField]
  private float movementRange = 5f;

  [SerializeField]
  private float movementSpeed = 3f;

  [SerializeField]
  private Animator animator;

   [SerializeField]
   private float animationParameterA = 0.5f;

  [SerializeField]
  private float animationParameterB = 1f;

  [SerializeField]
  private Transform myTransform;

  [SerializeField]
  private Vector3 someMoveVectorInDegree = Vector3.zero;

  [SerializeField]
  private AudioClip stepSound;

  [SerializeField]
  private AnimationCurve animationCurve;
}
1. Context
Organize the properties by context into groups.
using UnityEngine;

public class ExampleScript : MonoBehaviour
{
  [SerializeField]
  private Transform myTransform;

  [SerializeField]
  private Vector3 someMoveVectorInDegree = Vector3.zero;

  /// <summary>
  /// Must be in the Range 1 - 10
  /// </summary>
  [SerializeField]
  private float movementRange = 5f;

  [SerializeField]
  private float movementSpeed = 3f;

  [SerializeField]
  private Animator animator;

    [SerializeField]
    private float animationParameterA = 0.5f;

  [SerializeField]
  private float animationParameterB = 1f;

  [SerializeField]
  private AnimationCurve animationCurve;

  [SerializeField]
  private AudioClip stepSound;
}

2. Naming
To continue improving the inspector, create separation between the groups from the previous step by either adding space or adding headers with fitting names. Additionally, enhance the naming of variables by either removing excess detail or providing context for improved clarity.
using UnityEngine;

public class ExampleScript : MonoBehaviour
{
  [Header("Movement")]
  [SerializeField]
  private Transform movementTransform;

  [Space]
  [SerializeField]
  private Vector3 moveVector = Vector3.zero;


  [SerializeField]
  private float movementRange = 5f;

  [SerializeField]
  private float movementSpeed = 3f;

  [Header("Visuals")]
  [SerializeField]
  private Animator animator;

  [SerializeField]
  private float animationParameterA = 0.5f;

  [SerializeField]
  private float animationParameterB = 1f;

  [SerializeField]
  private AnimationCurve animationCurve;

  [Header("Audio")]
  [SerializeField]
  private AudioClip stepSound;
}

3. Tooltips
To regain the detail information that was lost in the previous step, consider adding it as a tooltip that can be easily viewed by hovering over the item in both the inspector and your IDE. It is worth noting that tooltips are the best place to include unit information, such as indicating whether an angle is in radians or degrees. This helps to avoid confusion when making adjustments to variables.
using UnityEngine;

public class ExampleScript : MonoBehaviour
{
  [Header("Movement")]
  [SerializeField]
  private Transform movementTransform;

  [Space]
  [Tooltip("In degrees")]
  [SerializeField]
  private Vector3 moveVector = Vector3.zero;

  [Tooltip("Must be in the range [1 - 10]")]
  [SerializeField]
  private float movementRange = 5f;

  [SerializeField]
  private float movementSpeed = 3f;

  [Header("Visuals")]
  [SerializeField]
  private Animator animator;

  [SerializeField]
  private float animationParameterA = 0.5f;

  [SerializeField]
  private float animationParameterB = 1f;

  [SerializeField]
  private AnimationCurve animationCurve;

  [Header("Audio")]
  [SerializeField]
  private AudioClip stepSound;
}


4. Attributes
Using attributes is an effective method for validating input values and preventing out-of-bounds errors. Some of the available attributes include those that clamp values within a specified range or define minimum values. If you require an attribute that is not built-in, you can find a wide variety of useful options on GitHub. Certain attributes only modify how a value is displayed in the inspector, making it easier to understand the impact of any adjustments.
using UnityEngine;

public class ExampleScript : MonoBehaviour
{
  [Header("Movement")]
  [SerializeField]
  private Transform movementTransform;

  [Space]
  [Tooltip("In degrees")]
  [SerializeField]
  private Vector3 moveVector = Vector3.zero;

  [Tooltip("Must be in the range [1 - 10]")]
  [Range(1f, 10f)]
  [SerializeField]
  private float movementRange = 5f;

  [Min(0.1f)]
  [SerializeField]
  private float movementSpeed = 3f;

  [Header("Visuals")]
  [SerializeField]
  private Animator animator;

  [Range(0f, 1f)]
  [SerializeField]
  private float animationParameterA = 0.5f;

  [Range(0f, 1f)]
  [SerializeField]
  private float animationParameterB = 1f;

  [SerializeField]
  private AnimationCurve animationCurve;

  [Header("Audio")]
  [SerializeField]
  private AudioClip stepSound;
}

Conclusion
After applying the steps outlined above, you can expect to see significant improvements in the layout and functionality of your inspector. By comparing the original inspector with the final enhanced version, you can easily visualize the benefits of organizing properties by context, enhancing variable naming, and adding tooltips and attributes for improved clarity and validation. With an optimized inspector, you can work more efficiently and effectively, allowing you to focus on developing your game and bringing your vision to life.